Tesla Model 3: Bezel - Handle - Seat Back - 2nd Row - LH (Remove and Replace)
Tesla Model 3 2017-2026 Service Manual / Seats / 2nd Row Seat Assemblies and Hardware / Bezel - Handle - Seat Back - 2nd Row - LH (Remove and Replace)
Remove
- Release the LH 2nd row seat back and fold it slightly forward.
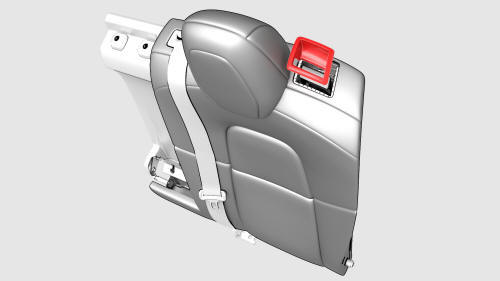
- Use a pry tool to release the clips (x2) that attach the LH 2nd row seat back handle bezel to the LH 2nd row seat back handle assembly, and then remove the bezel from the handle assembly
Install
- Install the LH 2nd row seat back handle bezel into the LH 2nd row seat back handle assembly, and then fasten the clips (x2) that attach the bezel to the handle assembly
- Unfold the LH 2nd row seat back so that it is upright and secured.
READ NEXT:
 Bolster - Side - Seat - 2nd Row - LH (Remove and Replace)
Remove
Fold down the LH 2nd row seat.
Pull the 2nd row side bolster inward, and then move the bolster up to
remove from the vehicle.
Remove and discard the bolster plastic bracket from t
Bracket - Hinge - Seat Back - 2nd Row - LH (Remove and Replace)
Remove
Remove the 2nd row lower seat cushion. See
Seat Cushion - Lower - 2nd Row (Remove and Replace).
Remove the LH 2nd row seat side bolster. See
Bolster - Side - Seat - 2nd Row - LH (Remove
Cap - Penthouse 12V (Remove and Replace)
Remove
Remove the 2nd row lower seat cushion. See
Seat Cushion - Lower - 2nd Row (Remove and Replace)
Lift the 12V cap straight up from over the high voltage controller
connector on the RH
SEE MORE:
Doors
Keyless Locking and Unlocking
Locking and unlocking Model 3 is easy and
convenient. Just carry your authenticated
phone or paired key fob with you. Model 3
recognizes the presence of an authenticated
phone or paired key fob and automatically
unlocks when you press a door handle, and
locks when
Headlight - LH (Remove and Replace)
Headlight - LH- Remove
It is recommended that the vehicle be powered down before executing headlight
replacement to ensure that the new headlights are recognized during vehicle
firmware update.
Remove
Raise and support the vehicle. See Raise Vehicle - 2 Post Lift.
Remove the rear underhood ap
© 2019-2026 Copyright www.tmodel3.com
