Tesla Model 3: Trim - C-Pillar - Rear - LH (Remove and Replace) - Install
Tesla Model 3 2017-2024 Service Manual / Interior Trim / Pillar and Sill Trim / Trim - C-Pillar - Rear - LH (Remove and Replace) / Trim - C-Pillar - Rear - LH (Remove and Replace) - Install
Install
- If reusing the same LH rear C-pillar trim, install new clips onto the trim.
- Move the seatbelt through the LH rear C-pillar trim.
- Slide the seatbelt bezel onto the seat belt, and then fasten the bezel clips that attach the seatbelt bezel to the LH rear C-pillar trim.
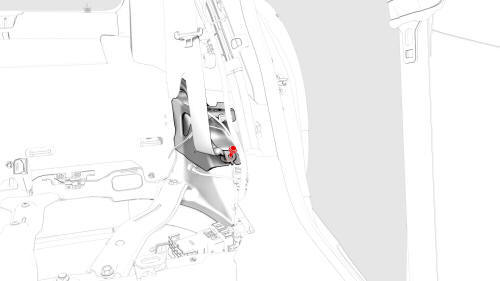
- Install a new bolt to attach the lower seatbelt anchor to the vehicle.
 Torque 30 Nm
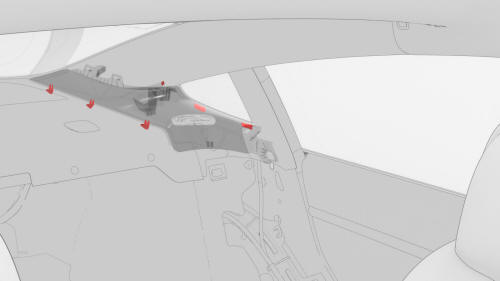
- Slide the rearmost tabs of the LH rear C-pillar trim into the body first, push the frontmost tabs toward the rear, and then fasten the clip and tabs that attach the LH rear C-pillar trim to the body.
- Install the LH upper C-pillar trim. See Trim - C-Pillar - Upper - LH (Remove and Replace).
- Install the LH side rail trim. See Trim - Side Rail - LH (Remove and Replace).
- Install the LH 2nd row seat side bolster. See Bolster - Side - Seat - 2nd Row - LH (Remove and Replace).
- Install the 2nd row lower seat cushion. See Seat Cushion - Lower - 2nd Row (Remove and Replace).
READ NEXT:
 Trim - C-Pillar - Upper - LH (Remove and Replace)
Remove
Remove the 2nd row lower seat cushion. See
Seat Cushion - Lower - 2nd Row (Remove and Replace).
Remove the LH 2nd row seat side bolster. See
Bolster - Side - Seat - 2nd Row - LH (Remove
Trim - Side Rail - LH (Remove and Install)
Remove
Open the LH rear door.
Release the push clips (x2) that attach the LH side rail trim to the LH
side rail.
Tip:
Release the top clip first (closest to the coat hanger) and work t
Trim - Side Rail - LH (Remove and Replace)
Remove
Remove the LH side rail trim. See
Trim - Side Rail - LH (Remove and Install).
Release the clips that attach the old LH side rail tethers to the LH
side rail, and then remove and d
SEE MORE:
Trim - B-Pillar - Upper - LH (Remove and Replace)
SPECIAL TOOLS
Key, Seat Belt Release, Model 3 (1133787-00-A)
Remove
Open both LH doors.
Move the LH front seat fully forward.
Use the seat belt release key to release the LH front seatbelt retainer
from the front seat.
Move the seatbelt shoulder adjustment to the fully down position.
Filter - Oil - Rear Drive Unit (Remove and
Replace)
SPECIAL TOOLS
Skt, Oil Filter, 63.5mm X 14
(1130484-00-A)
Kit, Drive Unit Oil Drain, Model
3 (1134264-00-A)
Procedure
Replace the oil filter according
to the gearbox fluid procedure. See
© 2019-2024 Copyright www.tmodel3.com
